Ghost Bunny Logo

Mastering Camera ISO and Shutter Speed: A Guide

Mastering Camera ISO and Shutter Speed: A Guide

Understanding ISO and shutter speed is fundamental for anyone venturing into photography and videography. These two settings significantly impact the exposure, quality, and overall look of your images and videos. In this post, we’ll break down these concepts, explain their relationship, and provide practical tips on how to set them up for both photo and video use.

Understanding ISO

ISO measures your camera sensor’s sensitivity to light. It originated from film photography, where different films had varying sensitivities. In digital cameras, ISO values typically range from 100 to 6400 or higher, with some advanced cameras offering even higher settings.
  • Low ISO (100-200): Ideal for bright conditions. Produces minimal noise, resulting in crisp, clean images.
  • Mid ISO (400-800): Useful for overcast days or indoor settings with good lighting. Provides a balance between sensitivity and noise.
  • High ISO (800+): Suitable for low-light situations. Increases sensor sensitivity but also introduces noise, which can degrade image quality.

Example:

  • Daylight Shooting: Set ISO to 100 or 200 to take advantage of the ample light.
  • Indoor or Night Shooting: Set ISO to 800 or higher, depending on available light, to ensure the sensor captures enough light.

“The time that leads to mastery is dependent on the intensity of our focus” – Robert Greene

Understanding Shutter Speed

Shutter speed refers to the length of time your camera’s sensor is exposed to light. It determines how long the camera’s shutter remains open when you take a photo or record a video. Shutter speed is measured in seconds or fractions of a second, such as 1/1000s, 1/500s, 1/30s, or even several seconds.

How Shutter Speed Works

When you press the shutter button on your camera, the shutter opens to allow light to hit the sensor. The amount of time the shutter stays open is controlled by the shutter speed setting. Here’s how different shutter speeds affect your photos and videos:

  • Fast Shutter Speed: (e.g., 1/500s, 1/1000s)

    • Effect: Captures fast-moving subjects sharply, freezing motion.
    • Uses: Sports, wildlife, action photography.
  • Slow Shutter Speed: (e.g., 1/30s, 1s, 30s)

    • Effect: Creates motion blur, which can give a sense of movement. Useful for artistic effects like light trails or smooth water.
    • Uses: Night photography, light painting, long exposure shots.

Practical Examples

  1. Freezing Motion:

    • Scenario: Photographing a running dog.
    • Setting: Shutter speed at 1/1000s.
    • Result: The dog appears sharp and in focus, with no blur.
  2. Creating Motion Blur:

    • Scenario: Capturing the flow of a waterfall.
    • Setting: Shutter speed at 1/2s.
    • Result: The water appears smooth and flowing, creating an artistic effect.
  3. Long Exposure:

    • Scenario: Shooting star trails at night.
    • Setting: Shutter speed at 30s or longer.
    • Result: Stars create trails across the sky, showing the Earth’s rotation.

Shutter Speed and Exposure

Shutter speed is a critical component of the exposure triangle, along with ISO and aperture. It directly affects the exposure of your image:

  • Longer Shutter Speed: More light reaches the sensor, resulting in a brighter image.
  • Shorter Shutter Speed: Less light reaches the sensor, resulting in a darker image.


Balancing shutter speed with ISO and aperture is essential to achieving the desired exposure and creative effect in your photos and videos. For instance, if you use a slow shutter speed to capture motion blur, you might need to lower the ISO or use a smaller aperture to prevent overexposure. Understanding and mastering shutter speed allows you to control motion in your photos and videos, creating either sharp, frozen moments or fluid, dynamic scenes. Experimenting with different shutter speeds will help you see how this setting impacts your images and improve your skills in both photography and videography.


The Relationship Between ISO and Shutter Speed

ISO and shutter speed are part of the exposure triangle, along with aperture. They work together to determine the exposure of your image. Changing one element often requires adjusting the others to maintain a balanced exposure.

  • ISO affects the sensor’s sensitivity.
  • Shutter Speed controls the duration of light exposure.
  • Aperture (f-stop) regulates the amount of light entering the lens.

Practical Scenarios:

  1. Bright Daylight Photography:

    • ISO: 100
    • Shutter Speed: 1/500s
    • Aperture: f/8
    • Result: Crisp, clear image with no motion blur or noise.
  2. Indoor Photography:

    • ISO: 800
    • Shutter Speed: 1/60s
    • Aperture: f/4
    • Result: Well-exposed image with minimal noise and acceptable sharpness.
  3. Night Photography:

    • ISO: 1600
    • Shutter Speed: 1/30s
    • Aperture: f/2.8
    • Result: Bright enough image but with some noise and slight motion blur.

Setting Up For Photography

When setting up your camera for photography, follow these steps:

  1. Determine Lighting Conditions: Assess the lighting of your environment. Bright conditions allow for lower ISO and faster shutter speeds.
  2. Set ISO: Start with the lowest ISO setting to minimize noise. Increase ISO only as necessary based on lighting conditions.
  3. Adjust Shutter Speed: Set according to your subject’s motion. Use a fast shutter speed to freeze action or a slow shutter speed to capture movement.
  4. Fine-Tune Aperture: Adjust the aperture to achieve the desired depth of field and to balance exposure. A wider aperture (low f-number) allows more light, useful in low-light conditions.

Example Setup:

  • Portrait in Natural Light:

    • ISO: 100
    • Shutter Speed: 1/200s
    • Aperture: f/2.8
    • Result: Sharp subject with a beautifully blurred background.
  • Landscape Photography:

    • ISO: 100
    • Shutter Speed: 1/125s
    • Aperture: f/11
    • Result: Detailed landscape with a large depth of field.

Setting Up For Videography

Videography settings differ slightly due to the need for consistent exposure and motion fluidity. Here’s a step-by-step guide:

  1. Frame Rate and Shutter Speed: The general rule is to set your shutter speed to double your frame rate (e.g., 24fps video = 1/48s shutter speed). This maintains natural motion blur, crucial for smooth, cinematic footage.
  2. Set ISO: Adjust ISO to maintain exposure without introducing too much noise. Ideally, keep ISO as low as possible for clean video.
  3. Use ND Filters: In bright conditions, neutral density (ND) filters help reduce light entering the lens, allowing you to maintain proper shutter speed and aperture without overexposing your video.
  4. Fine-Tune Aperture: Adjust the aperture to control depth of field and maintain desired exposure.

Example Setup for Videography:

  • 24fps Video in Daylight:

    • Frame Rate: 24fps
    • Shutter Speed: 1/48s (or closest setting like 1/50s)
    • ISO: 100
    • ND Filter: ND4 to ND8 (depending on brightness)
    • Aperture: Adjust to maintain depth of field
  • Low-Light Videography:

    • Frame Rate: 24fps
    • Shutter Speed: 1/48s
    • ISO: 1600
    • ND Filter: None
    • Aperture: f/2.8
    • Result: Bright enough video with acceptable noise levels.

Mastering ISO and shutter speed is essential for capturing stunning photos and videos. By understanding their relationship and how to adjust them based on lighting conditions and desired effects, you can take full control of your camera and achieve professional-quality results. Experiment with different settings and scenarios to see how they affect your images and videos, and soon, setting ISO and shutter speed will become second nature. Also be sure to download this printable card below where we’ve included an ISO/Shutter Speed Cheat Sheet for you to reference when you’re on the go! Happy shooting!
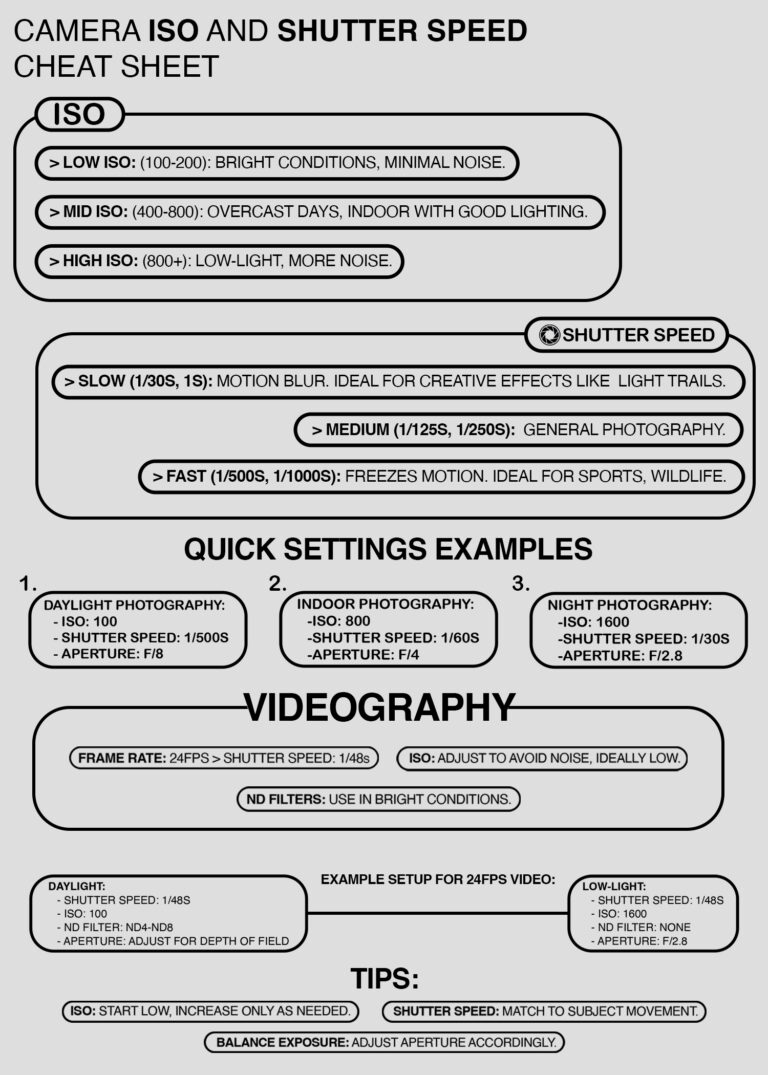
DOWNLOAD THE CHEAT SHEET:

Written By :

Alex Woods – Ghost Bunny Media

Post On :

Sept 13, 2024

Tags:

Cameras, Photography, Videography,